Below is a recording of the restore process of my iPhone 4s as I restore it to the latest version of 9.1 using idevicerestore in Linux. Restore is done at the 7:57 mark.
Thursday, November 5, 2015
Monday, September 28, 2015
Speed Test in Linux
If you want to test your internet speed using command line in Linux without using a browser, you can use speedtest-cli.
speedtest-cli is an application created in python by sivel (Matt Martz). At his git repository https://github.com/sivel/speedtest-cli , there are several ways to download and install the application. In my case, I git-clone it.
here's what I did:
then install:
here's the screenshot of my internet speed.

speedtest-cli is an application created in python by sivel (Matt Martz). At his git repository https://github.com/sivel/speedtest-cli , there are several ways to download and install the application. In my case, I git-clone it.
here's what I did:
git clone https://github.com/sivel/speedtest-cli
then install:
python setup.py install
here's the screenshot of my internet speed.
Tuesday, September 22, 2015
CHERRY MOBILE OMEGA ICON hang on logo only Problem.
Phone Problem:
Hang on logo
Files needed:
1. Omega icon stock firmware to be downloaded here.
(This is a 17-part rar'ed flash file.)
2. PC with adb and fastboot installed.
Procedure:
This procedure is done using Linux.
Extract the flash files in a directory. Open terminal and cd to the directory
where you extracted the files. Then type the ffg one by one.
fastboot flash aboot emm_appsboot.mbn
fastboot flash sbl1 sbl1.mbn
fastboot flash tz tz.mbn
fastboot flash rpm rpm.mbn
fastboot flash sdi sdi.mbn
fastboot flash modem NON-HLOS.bin
fastboot flash cache cache.img
fastboot flash usbmsc usbdisk.img
fastboot erase splash
fastboot flash splash splash.img
fastboot -S 256M flash system system.img
fastboot flash recovery recovery.img
fastboot -S 256M flash userdata userdata.img
fastboot flash boot boot.img
fastboot reboot
Afte the phone reboots, wait till it fully opens.
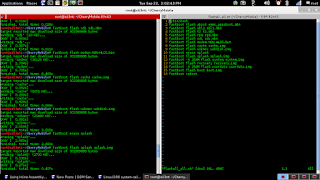
below are the screenshots of the flashing process and the phone after flashing.


Hang on logo
Files needed:
1. Omega icon stock firmware to be downloaded here.
(This is a 17-part rar'ed flash file.)
2. PC with adb and fastboot installed.
Procedure:
This procedure is done using Linux.
Extract the flash files in a directory. Open terminal and cd to the directory
where you extracted the files. Then type the ffg one by one.
fastboot flash aboot emm_appsboot.mbn
fastboot flash sbl1 sbl1.mbn
fastboot flash tz tz.mbn
fastboot flash rpm rpm.mbn
fastboot flash sdi sdi.mbn
fastboot flash modem NON-HLOS.bin
fastboot flash cache cache.img
fastboot flash usbmsc usbdisk.img
fastboot erase splash
fastboot flash splash splash.img
fastboot -S 256M flash system system.img
fastboot flash recovery recovery.img
fastboot -S 256M flash userdata userdata.img
fastboot flash boot boot.img
fastboot reboot
Afte the phone reboots, wait till it fully opens.
below are the screenshots of the flashing process and the phone after flashing.


Wednesday, July 1, 2015
My Journey to building Linux From Scratch (LFS) system PART3
CHAPTER 3
Now that we have the bootable USB flash drive, we can continue now by creating a partition onto which we will install our LFS system.
According to the book, we create a linux native partition and a swap partition using either cfdisk or fdisk.
using fdisk, I created a 40GB primary partition and a 2GB swap partition.
Now we will create a file system on the newly created partition. According to
the book, we should create an ext3 file system using the E2fsprogs
utilities. Specifically mke2fs.
#mke2fs -jv /dev/sda1where:
sda1 is my first partition.
mke2fs - is a program that creates an ext2/ext3 filesystem
- the "-j" means the create the filesystem with an
Then we initialize our swap partition.
#mkswap /dev/sda2
where: /dev/sda2 is our swap partition
To check, type blkid at the prompt, there should be an entry about /dev/sda1
and /dev/sda2
To access the partition, we mount it at /mnt/lfs.
#export LFS=/mnt/lfs -sets a variable LFS equal to /mnt/lfs
#mkdir -pv $LFS -create a directory /mnt/lfs
-"-p" means parent, "-v" means verbose
#mount -v -t ext3 /dev/sda1 $LFS
-mount our first partition to /mnt/lfs
-meaning we can access our first partition via
/mnt/lfs
note: make sure that the partition is mounted without too many restrictions
e.g. nosuid,nodev or noatime options, by using mount command.
#mount
the /dev/sda1 line should not show (nosuid,nodev,noatime)
Enable the swap partition using the swapon command
#/sbin/swapon -v /dev/sda2
Now we can download the packages and patches needed to build the basic LFS system. But since we are using the livecd as our base system, we don't need to download the packages, we just copy the packages from the /lfs-sources/ directory of the livecd to our newly created partition.
We need to create first a directory where we will install the packages and the patches.
#mkdir -v $LFS/sources
then we make this directory writable and sticky. sticky means multiple user
have write permission but only the owner can delete a file within this
directory.
#chmod -v a+wt $LFS/sources
where: a+w - means all have write access
t - means sticky
Now we download, or in our case, copy all the contents of /lfs-sources
directory to $LFS/sources.
inside /lfs-sources directory:
root[ /lfs-sources ]# cp * $LFS/sources
where: cp - the copy command
After copying the files and patches:
CHAPTER 4 - Final preparations
According to the book, we will create a $LFS/tools directory. This directory
will contain the installed programs compiled in CHAPTER 5 to separate them from the programs compiled in CHAPTER 6. The programs compiled here are temporary tools only and will not be a part of the final LFS system.
as root:
#mkdir -v $LFS/tools
then we create a /tools symlink on the host system that will point to the
$LFS/tools directory we just created
#ln -sv $LFS/tools /
the command ln above creates a link between the two files. The target file is
$LFS/tools (/mnt/lfs/tools), with a link name that is the same as the target
file and is located at the / (root) directory. The -s means create a symbolic
(or soft) link. So from the command above a soft link with a name /tools is
created that is linked to the directory $LFS/tools (or /mnt/lfs/tools).
Then we add user/group both named lfs
#groupadd lfs
#useradd -s /bin/bash -g lfs -m -k /dev/null lfs
where: -s /bin/bash : makes bash the default shell for the user
-g lfs : adds user to the group lfs
-m : create a home directory for user lfs
-k /dev/null : the skeleton directory that contains the files and
directories to be copied to the home directory.
/dev/null contains nothing. The significance of -k
option is that if it is not specified the default
/etc/skel files and directories will be copied to the
home directory.
lfs : is the name of the user
then give lfs user a password
#passwd lfs
grant user lfs ownership of $LFS/tools and $LFS/sources directory
#chown -v lfs $LFS/tools
#chown -v lfs $LFS/sources
then we login as user lfs
#su - lfs
where: su : switch user
- : start a login shell as opposed to only switch to user
lfs : switch as user lfs
then we setup a clean working environment from which building the temporary lfs system is based.
while logged in as user create two startup files, .bash_profile and .bashrc, for the bash shell.
lfs [~]$cat > ~/.bash_profile <<"EOF"
exec env -i HOME=$HOME TERM=$TERM PS1='\u:\w\$ ' bin/bash
EOF
where: exec env -i.. /bin/bash -
means replace the shell with a new one with an empty environment except the variables HOME,TERM and PS1
lfs [~]$ cat > ~/.bashrc << "EOF"
set +h
umask 022
LFS=/mnt/lfs
LC_ALL=POSIX
path=/tools/bin;/bin;/usr/bin
export LFS LC_ALL PATH
EOF
then source the just created user profile:
lfs [~]$ source ~/.bash_profile
next: CHAPTER 5
Friday, June 26, 2015
My Journey to building Linux From Scratch (LFS) system PART2
cont. from part1
The book provides link for FAQ and some references. For FAQ, the link is
http://www.linuxfromscratch.org/faq/.
Since we will create our LFS system by-the-book, we are going to follow the
book chapter by chapter. Chapter 1 of the book just provides us with the
introduction, some information, references and prerequisites. The above
information are taken from chapter 1 of the book.
CHAPTER 2: Preparing the new partition.
In this chapter, it shows us the instruction in creating a partition for our
base system. In my case, I will be using the whole partition of my netbook onto which I will install my LFS system. BTW, in this journey I will be installing the system on an ACER Aspire One netbook. This netbook doesn't have a CD-ROM, hence the reason that I will be creating a bootable USB. The book states a primary partition and a swap partition is going to be created. It also states that a 1.3 GB partition (up to 2-3 GB) is enough as a primary partition.
To create a partition cfdisk or fdisk command is used, as per the book. This
means that we must be already inside our host system. For those that have a
CD-ROM drive just boot your computer using the liveCD. For those that don't
have, We need to create first our bootable USB.
At this time, I will be deviating first from the books' instruction to create my
bootable USB.
According to the live CD documentation, we should install first GRUB on our
flash drive. But no instruction is given on how to install GRUB on our flash
drive. Now the first stumbling block. But since we're here to learn, we will
going to find everything we need to know about GRUB. What is GRUB? GRUB means GRand Unified Bootloader. A bootloader is a software that first runs when the computer starts. According to GRUB's manual, there are two versions of grub, grub-legacy and grub2.
To install GRUB on our flash drive, we invoke the grub-install command. Now
this looks like we really need another linux system with grub already installed to install GRUB on our flash drive. In my case, I already have a working linux system and I use my present system, I use Kali Linux btw, to install GRUB in my flash drive. So to install GRUB:
After installing grub, according to the liveCD documentation, we follow the
"BOOTING FROM ISO IMAGE" section of the documentation. It states that we copy the ISO image as a file into our drive and configure the boot loader to load "linux" as a kernel image and "initramfs_data.cpio.gz" as initrd.
"Store the ISO image of this CD as a file on a partition formatted with the
following filesystems: vfat, ntfs, ext2, ext3, ext4, jfs, reiserfs, reiserfs4,
xfs. Copy the /boot/isolinux/{linux,initramfs_data.cpio.gz} from your CD to the hard disk."
From the above instruction, we should format our flash drive with the above
mentioned filesystem and then copy the ISO image that we downloaded to the flash drive. Then after that we copy the
/boot/isolinux/{linux,initramfs_data.cpio.gz} files from the CD to our flash drive. The "hard disk" instruction above is applicable only if you want to boot from hard disk, since we are using our flash drive as a bootable device, we replace the hard disk with our flash drive.
Now to copy the files "linux, initramfs_data.cpio.gz" to our flash drive
we mount the ISO image. First we create a mount point and mount the ISO image to that mount point and then copy the aforementioned files.
After copying the ISO image and the two files, we configure the bootloader to load "linux" as the kernel image and "initramfs_data.cpio.gz" as initrd.
From the same section above, we should pass the following as a kernel parameter.
rw root=iso:/dev/xxx:/path-to-livecd.iso rootfstype=fs_type rootdelay=20
where: /dev/xxx - is the partition where we copy the lfslivecd.iso image
To configure our configuration file, we edit the created grub.cfg file to
something similar as below.
where: e0f3e26a-1d46-4478-9f1d-635dd53ff488 is the UUID of my USB flash drive.
Here is the screenshot when I boot my live USB LFS.


to be cont....
The book provides link for FAQ and some references. For FAQ, the link is
http://www.linuxfromscratch.org/faq/.
Since we will create our LFS system by-the-book, we are going to follow the
book chapter by chapter. Chapter 1 of the book just provides us with the
introduction, some information, references and prerequisites. The above
information are taken from chapter 1 of the book.
CHAPTER 2: Preparing the new partition.
In this chapter, it shows us the instruction in creating a partition for our
base system. In my case, I will be using the whole partition of my netbook onto which I will install my LFS system. BTW, in this journey I will be installing the system on an ACER Aspire One netbook. This netbook doesn't have a CD-ROM, hence the reason that I will be creating a bootable USB. The book states a primary partition and a swap partition is going to be created. It also states that a 1.3 GB partition (up to 2-3 GB) is enough as a primary partition.
To create a partition cfdisk or fdisk command is used, as per the book. This
means that we must be already inside our host system. For those that have a
CD-ROM drive just boot your computer using the liveCD. For those that don't
have, We need to create first our bootable USB.
At this time, I will be deviating first from the books' instruction to create my
bootable USB.
According to the live CD documentation, we should install first GRUB on our
flash drive. But no instruction is given on how to install GRUB on our flash
drive. Now the first stumbling block. But since we're here to learn, we will
going to find everything we need to know about GRUB. What is GRUB? GRUB means GRand Unified Bootloader. A bootloader is a software that first runs when the computer starts. According to GRUB's manual, there are two versions of grub, grub-legacy and grub2.
To install GRUB on our flash drive, we invoke the grub-install command. Now
this looks like we really need another linux system with grub already installed to install GRUB on our flash drive. In my case, I already have a working linux system and I use my present system, I use Kali Linux btw, to install GRUB in my flash drive. So to install GRUB:
#grub-install --root-directory=/media/usb0 /dev/sdbthen create a grub.cfg file
where /media/usb0 - is the mount point of my USB flash drive.
/dev/sdb - is the flash drive.
#grub-mkconfig /media/usb0/boot/grub/grub.cfg
After installing grub, according to the liveCD documentation, we follow the
"BOOTING FROM ISO IMAGE" section of the documentation. It states that we copy the ISO image as a file into our drive and configure the boot loader to load "linux" as a kernel image and "initramfs_data.cpio.gz" as initrd.
"Store the ISO image of this CD as a file on a partition formatted with the
following filesystems: vfat, ntfs, ext2, ext3, ext4, jfs, reiserfs, reiserfs4,
xfs. Copy the /boot/isolinux/{linux,initramfs_data.cpio.gz} from your CD to the hard disk."
From the above instruction, we should format our flash drive with the above
mentioned filesystem and then copy the ISO image that we downloaded to the flash drive. Then after that we copy the
/boot/isolinux/{linux,initramfs_data.cpio.gz} files from the CD to our flash drive. The "hard disk" instruction above is applicable only if you want to boot from hard disk, since we are using our flash drive as a bootable device, we replace the hard disk with our flash drive.
Now to copy the files "linux, initramfs_data.cpio.gz" to our flash drive
we mount the ISO image. First we create a mount point and mount the ISO image to that mount point and then copy the aforementioned files.
then we can go the directory /boot/isolinux and copy the two aforementioned files to our flash drive.
#mkdir mount_here
#mount -o loop -t iso9660 lfslivecd.iso mount_here
where: mount_here is the mount point of our USB flash drive at the current working directory
After copying the ISO image and the two files, we configure the bootloader to load "linux" as the kernel image and "initramfs_data.cpio.gz" as initrd.
From the same section above, we should pass the following as a kernel parameter.
rw root=iso:/dev/xxx:/path-to-livecd.iso rootfstype=fs_type rootdelay=20
where: /dev/xxx - is the partition where we copy the lfslivecd.iso image
To configure our configuration file, we edit the created grub.cfg file to
something similar as below.
menuentry 'Linux From Scratch Live USB' {
search --no-floppy --fs-uuid --set=root e0f3e26a-1d46-4478-9f1d- 635dd53ff488
echo 'Loading Linux From Scratch...'
linux /linux rw root=iso:/dev/sdb1:/lfslivecd.iso rootfstype=ext2 rootdelay=20
initrd /initramfs_data.cpio.gz
}
where: e0f3e26a-1d46-4478-9f1d-635dd53ff488 is the UUID of my USB flash drive.
Here is the screenshot when I boot my live USB LFS.


to be cont....
Tuesday, June 23, 2015
My journey to building Linux From Scratch (LFS) system
This will be a series of posts since I will start building Linux From Scratch (LFS) system from scratch. I will follow the by-the-book instruction from start to finish until I built my own LFS system. As I go through this journey, I invite/encourage anyone reading or care to read this blog, to follow along with the journey. Together we will create our own Linux system not because we want to "change the world" or something but to feel and see what its like to have our own linux distro. I also encourage you to document everything that we will be doing as what I am doing right now for future references. We are going to build the system because I hope that you like me are curious about how things work. I don't promise anything as we build the system but the satisfaction of fulfilling our curiosity and educating ourselves in the process. So let's go on building our own Linux From Scratch (LFS) system.
Tools:
LFS live CD - to be created as a bootable USB
(note: according to the website the live CD is not anymore supported and is not compatible with LFS 7.0 or later. from the same website, it contains the LFS book with 6.3 version. So I downloaded the said version of the book so that I can follow along its instructions.)
The reason that I am going to use the live CD is that it will serve as the base system from which my own LFS is built. A base linux system is needed to create your own LFS as stated on the website. By using the live CD, I eliminate the need for using a base system. We are going to follow the instructions by-the-book in building the system. But we are not going to follow it blindly, we're going to dissect the why's and the how's of the instructions to fully comprehend what is going on. If we are stuck on some instruction, we're going to stop and take some time and continue
only if we truly comprehend what we're doing. As I read somewhere, we have only 2 hrs of retention time of continuous reading so we are not going to risk doing the next instruction without really comprehending the previous one. That's the reason we are doing this in the first place, to educate ourselves. So come and join me on the ride. Now on to reading the first parts of the book.
According to the book, the prerequisites are knowledge of shell commands and knowledge of installing linux software, and others. The prerequisite section also provide some links for those who have no knowledge of the above since they are needed as a minimum prerequisite. For the host system requirements, it list the softwares and applications needed for the system to have. Since we are going to use the live CD we are not going to have to download all the applications since they are included in the CD as stated by the website. There is a script from the book which asks us to run to check if the above applications are present in the system. Since we're going to use the live CD, we are not going to use that script or follow that instruction. But for the purposes of "getting our hands wet" here is the script in uncomplete form.
$cat > version_check.sh << "EOF"
#!/bin/bash
bash --version | head -n1 | cut -d" " -f2-4
.
.
.
EOF
bash version_check.sh
Explanation of the above command. The first command creates a file named version_check.sh and "EOF" signifies the end of the file if you type it at the last line. The #!/bin/bash indicates that it is a bash script. The command bash --version indicates that it will show the version of the bash command. The | means pipe the output to the command head. The head command means output the first parts of the file, the argument -n1 means output the first one line of that first part. The cut command means to remove sections of the line. The -d is the delimeter argument and -f means to select only these fields. So the command cut -d" " -f2-4 means cut the line starting from the second field up the fourth field(in this case words) with the space delimeter between them. The last command executes the script.
to be continued.....
Monday, May 18, 2015
update/restore iphone 5 using linux (kali)
How to update/restore iPhone 5 using Linux OS.
Requirements:
Linux OS ( in my case Kali)
libimobiledevice
libimobiledevice is a cross-platform software library that talks the protocols to support iPhone®, iPod Touch®, iPad® and Apple TV® devices. It is released under GPL.
More information can be found at http://www.libimobiledevice.org.
To make use of the above-mentioned library, git-clone or download the source of all the files in the repository located at http://cgit.libimobiledevice.org/ , and build it from source.
syntax for restoring.
idevicerestore -e yourIPSW.ipsw
where yourIPSW.ipsw is the latest firmware for the appropriate iDevice.
full credits to the above-mentioned site and the authors/creators of the library.
below is the video of the update/restore process.
Subscribe to:
Posts (Atom)