This will be a series of posts since I will start building Linux From Scratch (LFS) system from scratch. I will follow the by-the-book instruction from start to finish until I built my own LFS system. As I go through this journey, I invite/encourage anyone reading or care to read this blog, to follow along with the journey. Together we will create our own Linux system not because we want to "change the world" or something but to feel and see what its like to have our own linux distro. I also encourage you to document everything that we will be doing as what I am doing right now for future references. We are going to build the system because I hope that you like me are curious about how things work. I don't promise anything as we build the system but the satisfaction of fulfilling our curiosity and educating ourselves in the process. So let's go on building our own Linux From Scratch (LFS) system.
Tools:
LFS live CD - to be created as a bootable USB
(note: according to the website the live CD is not anymore supported and is not compatible with LFS 7.0 or later. from the same website, it contains the LFS book with 6.3 version. So I downloaded the said version of the book so that I can follow along its instructions.)
The reason that I am going to use the live CD is that it will serve as the base system from which my own LFS is built. A base linux system is needed to create your own LFS as stated on the website. By using the live CD, I eliminate the need for using a base system. We are going to follow the instructions by-the-book in building the system. But we are not going to follow it blindly, we're going to dissect the why's and the how's of the instructions to fully comprehend what is going on. If we are stuck on some instruction, we're going to stop and take some time and continue
only if we truly comprehend what we're doing. As I read somewhere, we have only 2 hrs of retention time of continuous reading so we are not going to risk doing the next instruction without really comprehending the previous one. That's the reason we are doing this in the first place, to educate ourselves. So come and join me on the ride. Now on to reading the first parts of the book.
According to the book, the prerequisites are knowledge of shell commands and knowledge of installing linux software, and others. The prerequisite section also provide some links for those who have no knowledge of the above since they are needed as a minimum prerequisite. For the host system requirements, it list the softwares and applications needed for the system to have. Since we are going to use the live CD we are not going to have to download all the applications since they are included in the CD as stated by the website. There is a script from the book which asks us to run to check if the above applications are present in the system. Since we're going to use the live CD, we are not going to use that script or follow that instruction. But for the purposes of "getting our hands wet" here is the script in uncomplete form.
$cat > version_check.sh << "EOF"
#!/bin/bash
bash --version | head -n1 | cut -d" " -f2-4
.
.
.
EOF
bash version_check.sh
Explanation of the above command. The first command creates a file named version_check.sh and "EOF" signifies the end of the file if you type it at the last line. The #!/bin/bash indicates that it is a bash script. The command bash --version indicates that it will show the version of the bash command. The | means pipe the output to the command head. The head command means output the first parts of the file, the argument -n1 means output the first one line of that first part. The cut command means to remove sections of the line. The -d is the delimeter argument and -f means to select only these fields. So the command cut -d" " -f2-4 means cut the line starting from the second field up the fourth field(in this case words) with the space delimeter between them. The last command executes the script.
to be continued.....
Tuesday, June 23, 2015


Monday, May 18, 2015
update/restore iphone 5 using linux (kali)
How to update/restore iPhone 5 using Linux OS.
Requirements:
Linux OS ( in my case Kali)
libimobiledevice
libimobiledevice is a cross-platform software library that talks the protocols to support iPhone®, iPod Touch®, iPad® and Apple TV® devices. It is released under GPL.
More information can be found at http://www.libimobiledevice.org.
To make use of the above-mentioned library, git-clone or download the source of all the files in the repository located at http://cgit.libimobiledevice.org/ , and build it from source.
syntax for restoring.
idevicerestore -e yourIPSW.ipsw
where yourIPSW.ipsw is the latest firmware for the appropriate iDevice.
full credits to the above-mentioned site and the authors/creators of the library.
below is the video of the update/restore process.
Requirements:
Linux OS ( in my case Kali)
libimobiledevice
libimobiledevice is a cross-platform software library that talks the protocols to support iPhone®, iPod Touch®, iPad® and Apple TV® devices. It is released under GPL.
More information can be found at http://www.libimobiledevice.org.
To make use of the above-mentioned library, git-clone or download the source of all the files in the repository located at http://cgit.libimobiledevice.org/ , and build it from source.
syntax for restoring.
idevicerestore -e yourIPSW.ipsw
where yourIPSW.ipsw is the latest firmware for the appropriate iDevice.
full credits to the above-mentioned site and the authors/creators of the library.
below is the video of the update/restore process.
Sunday, April 20, 2014
A13 android based tablet running on Debian
The video below will show my A13 based tablet running on a Debian rootfs image that is originally created for A13 OLinuXino development board. This is the same tablet that i posted last time which runs on a minimal Debian and is now running with a pretty Desktop. The Image can be downloaded here. This tablet also runs on a bootable sd card. The instructions on how to create a bootable sd card can be found here.
credits of course to http://linux-sunxi.org for the information and HowTo and http://olimex.wordpress.com/ for the Debian image.
credits of course to http://linux-sunxi.org for the information and HowTo and http://olimex.wordpress.com/ for the Debian image.
Saturday, April 19, 2014
Allwinner A13 android based tablet running on debian.
I am a mobile phone techinician by profession. Included in my line of work is to repair all kinds of mobile phones, computer and laptops, and tablets. Here in my country, the Philippines, Android chinese tablets proliferate :):). One of those is the Allwinner A13 chip based android tablet. One of the problems that these tablets are having is hanging on android logo. This problem can be solved by wiping the /data partition or resetting the tablet to factory defaults, provided that the usb debugging option is enabled. Take note that these tablets have no recovery menu unlike those other branded tablets. Also there are no two tablets that are equal even though they look physically the same. You can visit this site http://www.techknow.me/forum/ and look inside the forum to find out more about these tablets.
Now, there is a way to fix the problem, by flashing. These tablets can be flashed using the Livesuit software which can be downloaded here. This aforementioned site also contains instructions on how to flash the tablets. But there is a catch here, as I mentioned above there are no two tablets that are the same, no..I am just kidding, there is, but only if you keep trying and flashing the tablet with so many firmware that are available in the internet and you might just get lucky :) :). So what is the solution?.
From the above site, information regarding booting from an sd card is also provided. So if we can boot from an sd card and we can mount the /data partition, we can effectively wipe that partition by removing its contents. Sounds logically right??:) :).
So, now my journey to A13 hacking is underway. BTW, the video below will show that I was able to create a bootable sd card with minimal debian on it.
But herein lies the problem, when i try to mount /dev/nande data, it seem to took too much time. So I guess I need to do some more digging.
Btw, I use minimal debian as my rootfs. You can wget/download it here.
I will try to do update on this one until i got it working.
Also, I will post the procedure that i did in creating a bootable sd card on my next post.
P.S. If anyone have an idea on how to go about this problem or why mount /dev/nande data is taking so much time, feel free to put a comment. Thanks.
Now, there is a way to fix the problem, by flashing. These tablets can be flashed using the Livesuit software which can be downloaded here. This aforementioned site also contains instructions on how to flash the tablets. But there is a catch here, as I mentioned above there are no two tablets that are the same, no..I am just kidding, there is, but only if you keep trying and flashing the tablet with so many firmware that are available in the internet and you might just get lucky :) :). So what is the solution?.
From the above site, information regarding booting from an sd card is also provided. So if we can boot from an sd card and we can mount the /data partition, we can effectively wipe that partition by removing its contents. Sounds logically right??:) :).
So, now my journey to A13 hacking is underway. BTW, the video below will show that I was able to create a bootable sd card with minimal debian on it.
But herein lies the problem, when i try to mount /dev/nande data, it seem to took too much time. So I guess I need to do some more digging.
Btw, I use minimal debian as my rootfs. You can wget/download it here.
I will try to do update on this one until i got it working.
Also, I will post the procedure that i did in creating a bootable sd card on my next post.
P.S. If anyone have an idea on how to go about this problem or why mount /dev/nande data is taking so much time, feel free to put a comment. Thanks.
Friday, December 21, 2012

Wednesday, September 12, 2012
Doro Phones Unlocker
Doro Phones Unlocker
Supported Models:
Doro 345, Doro 409, Doro 410, Doro 610
credits: abdoune for the source
download here
screenshot:
Supported Models:
Doro 345, Doro 409, Doro 410, Doro 610
credits: abdoune for the source
download here
screenshot:

Friday, August 31, 2012
Kingcom joypad 72 7" hang on android logo solution
This is the solution to the "hang on android logo" of a 7" chinese ipad.
The model of the chinese ipad is Kingcom joypad 72.
the chinese ipad:

the problem:

the solution:
Requirements:
1Gb micro SD or higher
Uberoid
1. First download the latest uberoid from here
2. Extract and click on CHANGER_WIN.bat (for windoze user).
3. Select option 7 as shown on the pics below.
 4. Follow the succeding instructions that will copy the files to the memory card.
5. Insert the memory card to the chinese ipad (note: chinese ipad must be off).
6. Turn On the chinese ipad and wait for the installation of the necessary files to finish.
finished product:

full credits to HardcoreHacker,of http://www.techknow.t0xic.nl forum, who is the creator of Uberoid.
for more info about chinese ipad modding and hacking just visit the above site.
hope it helps...
The model of the chinese ipad is Kingcom joypad 72.
the chinese ipad:

the problem:

the solution:
Requirements:
1Gb micro SD or higher
Uberoid
1. First download the latest uberoid from here
2. Extract and click on CHANGER_WIN.bat (for windoze user).
3. Select option 7 as shown on the pics below.

5. Insert the memory card to the chinese ipad (note: chinese ipad must be off).
6. Turn On the chinese ipad and wait for the installation of the necessary files to finish.
finished product:

full credits to HardcoreHacker,of http://www.techknow.t0xic.nl forum, who is the creator of Uberoid.
for more info about chinese ipad modding and hacking just visit the above site.
hope it helps...
Saturday, August 18, 2012
Cherry mobile candy invalid sim solution using only cli and adb...
for reference only...
Cherry Mobile Candy invalid sim solution using CLI and adb...
1. First you must have adb installed on your PC. (on how to install adb just try and search google)
2. Enable debugging mode in your CP.
3.Connect phone to PC and install the driver. (driver can be found here.)
4. Go to command prompt.
5. Go to the installation folder of adb.
7. Type the ffg. in sequence and press Enter for each line.
note: the first echo line is for the first IMEI
the second echo line is for the second IMEI
8. below is the finished product..

,,hope this helps..
Cherry Mobile Candy invalid sim solution using CLI and adb...
1. First you must have adb installed on your PC. (on how to install adb just try and search google)
2. Enable debugging mode in your CP.
3.Connect phone to PC and install the driver. (driver can be found here.)
4. Go to command prompt.
5. Go to the installation folder of adb.
In my case it is6. Type the "adb device" without quotes to check if phone is connected.
C:\Program Files(86)\Android\Android-sdk\platform-tools.
7. Type the ffg. in sequence and press Enter for each line.
adb shell
su
echo 'AT+EGMR=1,7,"yourIMEIhere"'>/dev/pttycmd1
echo 'AT+EGMR=1,10,"yourIMEIhere"'>/dev/pttycmd1
reboot
note: the first echo line is for the first IMEI
the second echo line is for the second IMEI
8. below is the finished product..

,,hope this helps..
Wednesday, August 15, 2012
How to unlock Skype Phone S2
This is how to unlock skype phone S2 by purchasing credits from http://www.dc-unlocker.com/.
1. First download the DC-unlocker client software .
2. Install the client software in your PC (windoze).
3. Fully Turn-on the phone and connect to your PC.
4. Windoze will automatically detect and install the drivers.
5. Open the Dc-unlocker client software .
6. Select SkypePhone AMOI in manufacturer and Autodetect in model.
7. Click on the magnifying glass icon to detect phone.

Note:
(If you have not yet buy any credits from www.dc-unlocker.com just click on buy credits.)
(SkypePhone S2 unlock require 10 credits)
8. Click on Server and enter your account details and password.
9. Click on Unlocking Tab and press Unlock.

10. Wait till the program connects to the server and unlocks your phone.
1. First download the DC-unlocker client software .
2. Install the client software in your PC (windoze).
3. Fully Turn-on the phone and connect to your PC.
4. Windoze will automatically detect and install the drivers.
5. Open the Dc-unlocker client software .
6. Select SkypePhone AMOI in manufacturer and Autodetect in model.
7. Click on the magnifying glass icon to detect phone.

Note:
(If you have not yet buy any credits from www.dc-unlocker.com just click on buy credits.)
(SkypePhone S2 unlock require 10 credits)
8. Click on Server and enter your account details and password.
9. Click on Unlocking Tab and press Unlock.

10. Wait till the program connects to the server and unlocks your phone.
Wednesday, April 18, 2012
Sony Ericsson U8a vivaz (fido-locked) unlock through code
the phone is fido-locked and we need to unlock it so that it can be used locally
1. this is when i insert an unaccepted local sim card
 2. Press unlock and it will bring you to the screen below..
 3. Click on "Network" (with a locked icon) and it will bring you to the screen below..
 4. Enter the code provided by your favorite unlock service and press ok. The phone will reboot and your phone is now unlocked.


Wednesday, July 6, 2011
jailbreakme 3.0 is now live..
The userland jailbreak JailbreakMe is now live. Just like the previous version of JailbreakMe 2.0, this is the easiest way to jailbreak your iOS devices on 4.3.3. As in the previous versions of JailbreakMe, this relies on the same PDF exploit on the Safari browser.
Here's the How-To:
Open the Safari browser and type http://jailbreakme.com.
Once the website loaded, click on install and then click on free.
Safari will automatically close and then a pop-up will appear informing you that cydia has been installed.
You should now see the cydia icon on your home screen.
As with the previous warning..Do this at your own risk.
Happy jailbreaking everyone..
Here's the How-To:
Open the Safari browser and type http://jailbreakme.com.
Once the website loaded, click on install and then click on free.
Safari will automatically close and then a pop-up will appear informing you that cydia has been installed.
You should now see the cydia icon on your home screen.
As with the previous warning..Do this at your own risk.
Happy jailbreaking everyone..
Wednesday, April 20, 2011
redsn0w 0.9.6rc14 now released....
The Dev-Team released an update on its jailbreak tool redsn0w. Now on rc14, it now includes the untether jailbreak fix for iphone 4. This tool now can untether-jailbreak all iOS devices on firmware 4.3.2 except for ipad2.
below is the details of the update as taken from the Dev-team site.

you can download redsn0w rc14 here:
windows
OSX
source
below is the details of the update as taken from the Dev-team site.

you can download redsn0w rc14 here:
windows
OSX
source
Tuesday, April 19, 2011
redsn0w 0.9.6rc13 for 4.3.2 iOS untethered jailbreak now out!!!!
The Dev-Team has just released a new version of redsn0w. This new version (redsn0w 0.9.6rc13) will untether-jailbreak the new iOS 4.3.2 firmware recently released by Apple. These version still includes the same hole used by @ionic for his 4.3.1 untether jailbreak.
These version will work on all iOS devices with 4.3.2 firmware except for the ipad2 and iphone 4.
see screenshot below as taken from Dev-Team website.

full credits to @ion1c for the untether jailbrea and the Dev-Team for the redsn0w tool.
source
happy jailbreaking..
These version will work on all iOS devices with 4.3.2 firmware except for the ipad2 and iphone 4.
see screenshot below as taken from Dev-Team website.

full credits to @ion1c for the untether jailbrea and the Dev-Team for the redsn0w tool.
source
happy jailbreaking..
Sunday, April 10, 2011
How to update sony ericsson xperia x10i using SE PC companion..
This is the procedure on how to update your sony ericsson xperia x10i to 2.1 using the sony ericsson pc companion.
1. Connect your phone to your PC.
2. On your mobile you will be presented with three options as seen below.

If you have not yet installed the PC companion just select "Install PC companion" and the PC companion will be installed on your pc, otherwise choose "Connect your Phone"
3. Once your phone is connected. The PC companion will detect that your phone needs an update as seen by the image below. Then press update.

4. Click Next

5. Put a check on the check box and click next.

6. When you reach the stage below, disconnect your phone, power off your mobile, hold down the back button then connect your mobile to the PC, as instructed by the PC companion.

7. At this stage, if it will download the file from the internet and after it is finished downloading it will automatically update your mobile. It is important that you does not disconnect the mobile during these stage.


8. Wait till finish.


below is the mobile after update.

1. Connect your phone to your PC.
2. On your mobile you will be presented with three options as seen below.

If you have not yet installed the PC companion just select "Install PC companion" and the PC companion will be installed on your pc, otherwise choose "Connect your Phone"
3. Once your phone is connected. The PC companion will detect that your phone needs an update as seen by the image below. Then press update.

4. Click Next

5. Put a check on the check box and click next.

6. When you reach the stage below, disconnect your phone, power off your mobile, hold down the back button then connect your mobile to the PC, as instructed by the PC companion.

7. At this stage, if it will download the file from the internet and after it is finished downloading it will automatically update your mobile. It is important that you does not disconnect the mobile during these stage.


8. Wait till finish.


below is the mobile after update.

ultrasn0w 1.2.1 for iOS 4.3.1 now released...
Dev-Team has now released ultrasn0w 1.2.1. This release is a compatibility fix for iOS 4.3.1. This version supports the basebands (01.59.00; 04.26.08; 05.11.07; 05.12.01 ; 05.13.04 and 06.15.00) that are supported by the previous version of ultrasn0w.
See details below as per the Dev-Team website.
source
See details below as per the Dev-Team website.
"Update #2:
We’ve pushed out the 4.3.1 compatibility fix for ultrasn0w in Cydia — it’s now at version 1.2.1. If you’re not already at 4.3.1 and you need the unlock, please be sure you understand how to get to 4.3.1 using a custom IPSW that doesn’t update your baseband. There are lots of guides for this (like at iClarified.com).
This isn’t a new unlock! It’s to allow those who are already using ultrasn0w to use FW 4.3.1. It also fixes the signal bar issue for those who aren’t using the unlock but retain an older baseband intentionally.
AFTER INSTALLING ULTRASN0W 1.2.1, PLEASE REBOOT YOUR iPHONE using the normal “slide to power off” swipe. T-Mobile users in the USA also should disable 3G mode in Settings->General->Network.
A big thanks to @sbingner and @ronaldsb for helping with the testing of this update!"
source
Saturday, April 9, 2011
redsn0w rc12 released....

Thursday, April 7, 2011
redsn0w update released..redsn0w rc11
Dev-Team just recently released an update of redsn0w. Now on release rc11, it fixes issues such as enabled too many Settings options.Also, an added option to enable boot animation is also added.
below is the details of its release as given by the Dev-Team
source here.
Download redsn0w rc11 here.
OS X redsn0w
Windows redsn0w
below is the details of its release as given by the Dev-Team
Update #1:
Those running redsn0w may have noticed we enabled too many Settings options in some versions of the jailbreak (for instance, what you want your side switch to do, even if you have no side switch because you’re not using an iPad). Release rc10 of redsn0w corrects that (you can just run it over your existing jailbreak…be sure to de-select Cydia to avoid package conflicts).
Along the way, we’ve also added the option to enable boot animations…these animations can be installed via Cydia, but be sure to select which animation to use via the Settings->Bootlogo setting after you’ve downloaded an animation (and again, you can just run rc10 rc11 over your existing jailbreak…be sure to de-select Cydia to avoid package conflicts).
(The boot animation we tested against was “Android Boot Logo”. It correctly installs all the dependencies needed to run the animation at each boot).
redsn0w 0.9.6rc10:
redsn0w_0.9.6rc11: (rc11 makes the boot animation a bit more robust across all devices)
source here.
Download redsn0w rc11 here.
OS X redsn0w
Windows redsn0w
Tuesday, April 5, 2011
IPAD 4.3.1 Jailbreak via Redsn0w RC9
In my entry here, I informed you about the latest redsn0w release of the Dev-Team for the untethered jailbreak for the 4.3.1 iOS devices.
Now we will try to jailbreak a 4.3.1 ipad.
Below are the screenshots and the procedures.
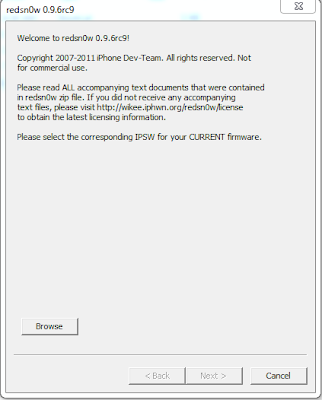
1. Open redsn0w RC9 and click on browse.
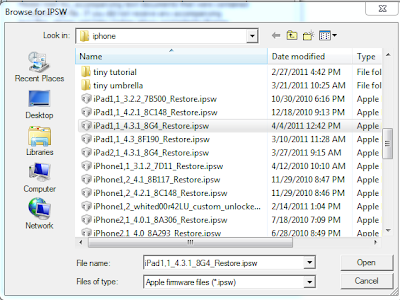
2. Choose iPad 4.3.1 and click open.
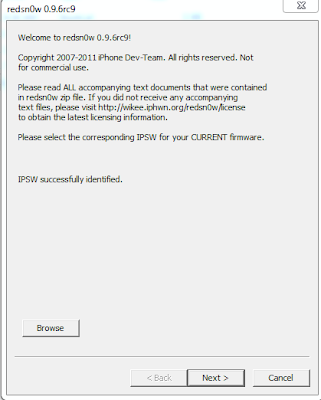
3. Wait until redsn0w shows "IPSW successfully indentified", then press NEXT.
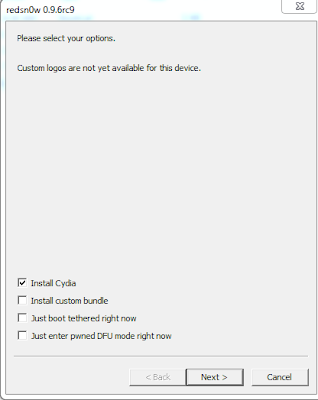
4. Click NEXT, make sure Install Cydia is checked.
5. Turn OFF your iPad and connect to computer, then Press NEXT.
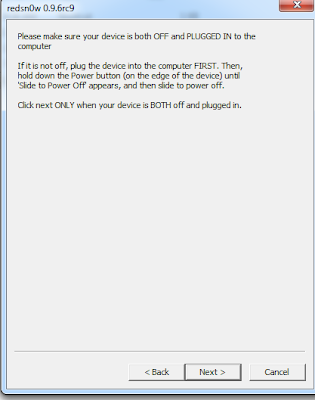
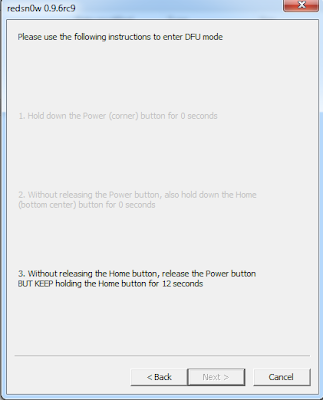
6. On this stage, follow the on-screen instruction by redsn0w to put your iPad in DFU mode, then press NEXT.
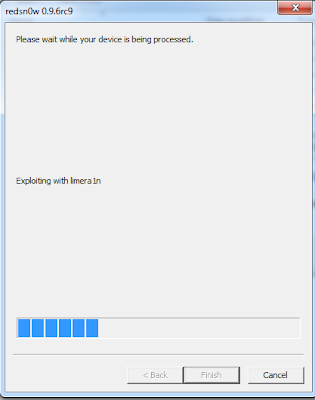
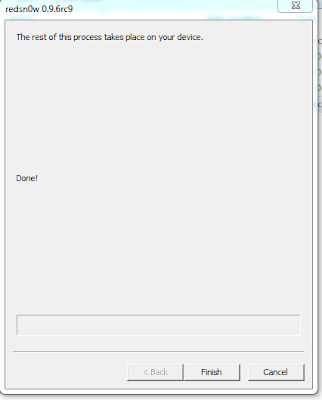
7. Wait till finished.
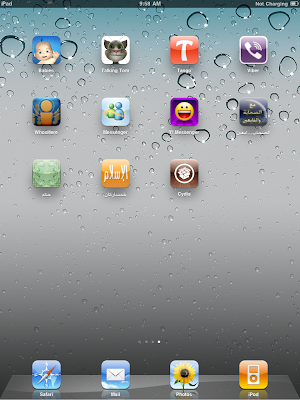
below is the iPad with cydia on screen..
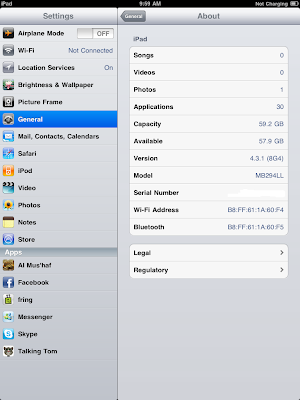
below is the version
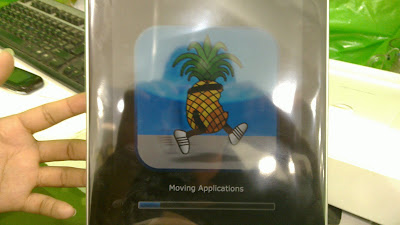
below is the iPad during jailbreaking process..
Full credits to the DEV-Team for the updated redsn0w.
btw the hand belongs to khen (lol), thanks khen for the "hands-on" assistance....
Now we will try to jailbreak a 4.3.1 ipad.
Below are the screenshots and the procedures.
1. Open redsn0w RC9 and click on browse.

2. Choose iPad 4.3.1 and click open.

3. Wait until redsn0w shows "IPSW successfully indentified", then press NEXT.

4. Click NEXT, make sure Install Cydia is checked.

5. Turn OFF your iPad and connect to computer, then Press NEXT.

6. On this stage, follow the on-screen instruction by redsn0w to put your iPad in DFU mode, then press NEXT.

7. Wait till finished.


below is the iPad with cydia on screen..

below is the version

below is the iPad during jailbreaking process..

Full credits to the DEV-Team for the updated redsn0w.
btw the hand belongs to khen (lol), thanks khen for the "hands-on" assistance....
Monday, April 4, 2011
sn0wbreeze 2.5 for 4.3.1 released!!!
Just minutes ago @iH8sn0w released sn0wbreeze 2.5 for 4.3.1 iOS devices.

This latest version of sn0wbreeze incorporates the latest untethered jailbreak released by the Dev-Team.
You can download the latest version of sn0wbreeze at http://ih8sn0w.com.

This latest version of sn0wbreeze incorporates the latest untethered jailbreak released by the Dev-Team.
You can download the latest version of sn0wbreeze at http://ih8sn0w.com.
UNTETHERED JAILBREAK for 4.3.1 released!!!!
The Dev-Team have just recently released the untethered jailbreak for 4.3.1 iOS devices. The 4.3.1 iOS version is the latest firmware released by Apple.
This release of untethered jailbreak by the Dev-Team is the one the jailbreak community have been waiting for since previous jailbreaks for the 4.3.1 iOS are tethered.
below are the details and the accompanying warning by the Dev-Team for the untethered jailbreak....
For those who are previously jailbroken (tethered), you can run the untethered jailbreak over your previously tethered jailbroken device.

For the step by step instruction on how to jailbreak your device see http://bit.ly/g1bHEk.
Dev-Team web site for the source.
Note to the users:Do this at your own risk.
NOte to the jailbreakers and unlockers: YOu already know the risks. lol..
HAPPY JAILBREAKING....
This release of untethered jailbreak by the Dev-Team is the one the jailbreak community have been waiting for since previous jailbreaks for the 4.3.1 iOS are tethered.
below are the details and the accompanying warning by the Dev-Team for the untethered jailbreak....
WARNING WARNING — ultrasn0w users don’t update yet! See a few paragraphs down!
The 4.3.1 untether exploit comes courtesy of Stefan Esser (@i0n1c on twitter), a security researcher based in Germany. Stefan has a long history of vulnerability research, and ironically his first contribution to the iPhone jailbreak community was improved security — last year he beat Apple to the punch and implemented ASLR for jailbroken iPhones with his “antid0te” framework. We’re happy to see that Stefan then turned his iPhone attention over to an untethered jailbreak exploit!
The 4.3.1 untether works on all devices that actually support 4.3.1 except for the iPad2:
iPhone3GS
iPhone4 (GSM)
iPod touch 3G
iPod touch 4G
iPad1
AppleTV 2G (PwnageTool only for now)
The reason the untether won’t work as-is on the iPad2 is that it requires a bootrom or iBoot-level exploit to install, and the iPad2 is not susceptible to either the limera1n or SHAtter bootrom exploits.
WARNING WARNING — ultrasn0w users don’t update yet! We need to first release an update to ultrasn0w that fixes some incompatibilities when FW 4.3.1 is used on the older basebands supported by ultrasn0w. And remember once we do fix ultrasn0w for 4.3.1 (we’ll announce it here and on twitter), you must only get there via a custom IPSW from PwnageTool, Sn0wbreeze or xpwn! Don’t ever try to restore or update to a stock IPSW, or you’ll lose the unlock!
For everyone else, redsn0w is the easier program to use (and redsn0w runs on both Mac and Windows). Please check out places like iClarified for some excellent guides on how to use both PwnageTool and redsn0w.
For those who are previously jailbroken (tethered), you can run the untethered jailbreak over your previously tethered jailbroken device.

For the step by step instruction on how to jailbreak your device see http://bit.ly/g1bHEk.
Dev-Team web site for the source.
Note to the users:Do this at your own risk.
NOte to the jailbreakers and unlockers: YOu already know the risks. lol..
HAPPY JAILBREAKING....
Subscribe to:
Posts (Atom)